Pages

Tuesday, November 9, 2010

Ubuntu(4) Software, Tools and Libraries

Software, Tools and Libraries

Now we will install software / tools and libraries to start working, Ubuntu is quite flexible in the way you can install new apps: we can use a GUI to do it (Ubuntu Software center / Synaptics), or  we can use the command line (Terminal) old but trusty way.. I will show you both ways but i prefer the terminal because it's just faster and simpler to install packages, (You can choose anyway):

Installing software using the terminal


To open the terminal just press Applications > Accesories > Terminal


The black screen is the terminal, not very impressive, but it's very powerful, the $ prompt is waiting us to type commands....


Now for installing software we will use the command "sudo apt-get install X", where X is the package you want to download and install, notice "sudo" > su-peruser do > that means the next command will be executed with super user privileges , after we type the command (in the screen i use it to install codeblocks), Ubuntu will ask for the user password, and then if the package is found in the software repositories you will have to type "y"es to continue with the installation.


Here you see the process, finally we have the prompt again $: the software is installed, now we are going to install all those packages :


  • "codeblocks" > The c++ IDE
  • "g++" > The G++ command line compiler
  • "libsdl-dev" > The development SDL libraries
  • "gimp" > The GNU image manipulation program
So we will be using the commands:
-sudo apt-get install codeblocks
-sudo apt-get install g++
etc,etc

Installing software using the Ubuntu Software Center

Now i will install codeblocks using  the ubuntu software center:


Open Aplications > Ubuntu Software Center


Now you can browse for new software or search, we will search typing on the search bar (top right) "codeblocks".


Ubuntu has found it on the repositories, now just press Install


Type the user password to install.


Installing packages...


It's installed , you can get more info about the software or uninstall it.

We will install more software later but now we have a basic pack to start:
  • Openoffice (Already installed with Ubuntu)
  • Gimp (We have to install it)
  • Codeblocks + libraries (We have to install them)
In the next Post we will be programming our first  c++ SDL aplication with codeblocks!


Monday, November 8, 2010

Ubuntu(3) Updating Ubuntu

Security Updates

After installing Ubuntu we will  continue with some basic settings to start using codeblocks.

First we will update Ubuntu, it's important to always keep the system updated to prevent security problems.


Go to System > Administration > Update Manager.


Select Check and all the available updates will pop up, then push Install Updates.


Ubuntu will ask your password to install the updates.


Now it downloads the packages...


Then it will install the updates...


You are done!

Tuesday, November 2, 2010

Ubuntu(2) Installing Ubuntu

Let's install Ubuntu!

We already have the cd with the recorded ubuntu image, we just need to:
  • Insert the ubuntu cd into the CD/DVD drive from our PC.
  • Make our PC start from the CD/DVD drive: depending in the brand and model you will need to set up the pc to arrange the boot order in the computer BIOS so the CD/DVD drive is the first bootable medium in the list (to get into the BIOS you have to press a particular key when booting like "Delete" (Award BIOS),  "F10" (HP computers), "F2"(Other models).
  • After that when we turn on the PC it should start booting from the Ubuntu CD, after a while you'll get that screen:
  • Here we will select the language used to install ubuntu, select it from the left combo, and then push "Install Ubuntu"
  • I select the option "Download updates while installing" becouse there will always be updated packages since the ubuntu iso image was launched, then push "Forward"

  • Now we have arrived to the dreaded "Partitioning hell". We have two possibilities here:
  1. We don't have any operating system installed (So we can just "Erase and use the entire disk" and press "Forward").
  2. We do have other operating systems: Before you ever think in taking any step I encourage you to make a complete backup from your data, (not joking, you can loose all the data on your hdd), then we can get rid of the other OSs just pressing "Erase and use the entire disk" and press "Forward", but probably we will want to keep both OSs working on the same HDD, so just select "Install alongside other operating systems" and "Forward".

  • If we are just installing Ubuntu , then select "Install Now", other way we will have to assign the size of the partitions for every OS installed on the HDD, if we select a size for a partition smaller than the data stored we will loose data and probably completely break the operating system, so be careful!, if you don't know what to do just accept the partitioning offered by Ubuntu and continue without making any changes.


  • Here we select the timezone where we live and "Forward".

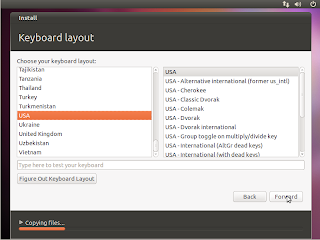
  • Select the keyboard from our pc and "Forward"...


  • That's a very important step, now we are going to create the user to work with Ubuntu, just write down the name desired for your user , the password twice , the "Computer name" is not really important unless you want to create a network with other computers, so you can just ignore it, and always select "Require my password to log in" to prevent anybody to get inside your computer just turning on the computer... , if you feel paranoyd or plan to travel with a laptop with sensitive data inside, you can "Encrypt my home folder" to increase the security.


  • Now we can just sit and relax, ubuntu will partition the HDD, copy files, download updates , and install the packages, depending on your PC it will be faster or slower...


  • Ubuntu with the installation slideshow..


  • Finally Ubuntu is installed! just press "Restart Now" and the computer will restart.


  • That's the login dialog for Ubuntu, just type the username and password, and Ubuntu will load the desktop.