

Important Note: From <now> i have decided to change the structure of the posts, i have received comments because my posts were confusing: I was mixing mandatory statements with suggestions and various and confusing thoughts, so i have decided to split this posts in two parts, the first one is going to be the objectives for the current post and the discussion about how to do things and my thoughts (in Italic), the second one is the solution to the problem.
In this post we have two objectives:
- Define and draw a hero.
- Define a camera, draw the map using the camera.
So we need a hero, in the near future it's going to fight the foes and rescue the princess (Female heroes will rescue the prince of course), but at the moment we just need to be able to draw the hero in the map, and to move him/her around it.
So what do we need? We just need to locate the hero in the map to draw it (X and Y location), that's all from now!, we are going to create the PcX, PcY and PcSpeed variables to store the position of the Player and the speed.
int PcX,PcY,PcSpeed;

PcX = 110;
PcY = 310;
PcSpeed = 5;
<It's always better to encapsulate things into classes , that's why it's useful C++, but sometimes, for simple things it is much more faster to just define a few variables, so that's what I'm going to do with the Hero (and with the camera too), the hero will grow in the future and will become a class(but not now)>
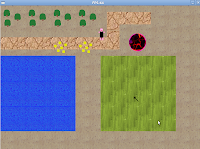
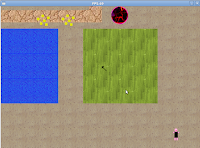
Since i started drawing the map on previous posts i was drawing just a small piece of it, showing just 8x6 tiles starting from the top-left corner of the map(screen), now the objective is to have a camera that follows the PC around the map.
I have been thinking in it and realized there was at least three kind of common cameras used in is the games (2D games):
- A camera that constantly moves, following the hero so we have the feeling that the hero is stopped and the map is moving.
- A camera that show a part of the map , and only moves when the hero is about to get out the map, so it will adjust the view only to prevent us to loose the hero.
- A fixed camera that shows a screen, when the user gets out of the screen it loads another complete scree.
To set up a camera we just need to define 4 variables: Width and height of the field of view , and the start of the camera "window", we could use a SDL_rect to define it so we will have something like:
SDL_Rect Camera;
Camera.x= 1;
Camera.y= 1;
Camera.w= 800;
Camera.h= 600;
Camera.x and Camera.y is the top-left corner of the camera, Camera.w and Camera.h is the window size that will be displayed.
Now, into the key input we need to move the player around the map, increasing it's x and y coordinates (adding or substring the PjSpeed), we must prevent player from getting outside the map so x and y must be always between 1 and 4900 (tiles*tilesize), finally we have to make the camera follow the player if it gets out the camera bounds:
keys=SDL_GetKeyState(NULL);

if (keys[SDLK_UP] ) PcY-=PcSpeed;
            if (PcY<1)PcY=1;
            while (PcY  <= (Camera.y )) Camera.y-=1;
if (keys[SDLK_DOWN] ) PcY+=PcSpeed;
            if (PcY>4900)PcY=4900;
        while (PcY +100 >= (Camera.y  + Camera.h ) )Camera.y+=1;
if (keys[SDLK_LEFT] ) PcX-=PcSpeed;
            if (PcX<1)PcX=1;
          while (PcX <= (Camera.x )  )Camera.x-=1;
if (keys[SDLK_RIGHT] ) PcX+=PcSpeed;
            if (PcX>4900)PcX =4900;
          while (PcX +100  >= (Camera.x  + Camera.w ))Camera.x+=1;
The map drawing function has changed , now it travels across the map starting from the top left corner of the camera , translating the camera position (in pixels), to the properly tile in the map array, then it will blit the tile from all the three layers, notice the blitting function in the engine has changed, i will explain it later...
for (x=Camera.x/100 ;x<=Camera.x/100 + (Camera.w/100);x++){//Process map
    for (y=Camera.y/100  ;y<=Camera.y/100 + (Camera.h/100);y++){

       myengine.BlitTileset(x *myengine.TileSize-Camera.x,
y *myengine.TileSize-Camera.y,Map[x][y][0]); //Display map, layer 1
myengine.BlitTileset(x *myengine.TileSize-Camera.x,y *myengine.TileSize-Camera.y,Map[x][y][1]);//Display map, layer 2
myengine.BlitTileset(x *myengine.TileSize-Camera.x,y *myengine.TileSize-Camera.y,Map[x][y][2]);//Display map, layer 3
};
};
Now we draw the player, adjusting it to the camera too:
myengine.BlitTileset(PcX - Camera.x ,PcY -Camera.y ,16); //Display player
Finally i have added a new function to the simple engine: Text drawing, to test it i have added this code to the main program:
myengine.SetTextColor( {0, 0, 255 }); // Set the text color
myengine.TextOut(10,10,"Rpg test"); //Draw the text at 10,10..
myengine.SetTextColor( {0, 255, 0 });
myengine.TextOut(10,30,"Rpg test");
myengine.SetTextColor( {255, 0, 0 });
myengine.TextOut(10,50,"Rpg test");
Now we are going to change the simple engine.
<Basically i have just changed two functions here: the blitting function and the mouse drawing function, after thinking about it i've seen that the blitting function was too complicated so i have reduced it to the x and y (pixel) start position and the tile to draw, i have added too a pair of functions to draw text on the screen , a function we are going to use in the next tutorials, there are two new functions: SetTextColor(SDL_color) to adjust the text color and Textout(x,y, TextToDraw), and that's it>
<engine.h>
#ifndef ENGINE_H #define ENGINE_H #include//SDL library #include //+SDL_image library (I use it for loading .png files) #include "SDL/SDL_ttf.h"//+SDL text library #include class Engine { public: SDL_Surface* screen; //The screen SDL_Surface* tileset; //A simple tileset for testing purposes only SDL_Surface* text;//The text surface TTF_Font *font;//The font that's going to be used SDL_Color textColor; //The color of the font int ScreenX;//Width of the screen int ScreenY;//Height of the screen int bpp;//Bit Per Pixel (colour depth) int MouseX; //Mouse x position int MouseY; //Mouse y position Uint8 MouseButtons; //Mouse button pressed int Frames; //Actual frame int FPS; //Frames per second int StartTick; int LastTick; Uint8 TileSize; //size of the default tile Engine(); //creator virtual ~Engine(); //destructor void SetVga(Uint16 Width, Uint16 Height, Uint8 BPP,bool FullScreen); //Set the video mode void FillColour(Uint8 r,Uint8 g,Uint8 b); //fill screen with a colour void Flip(); //Flips the backbuffer to the primary buffer void LoadTileset(const char *File); //loads a test tileset void DrawMouse(); //refresh mouse position and buttons pressed void BlitTileset(int x,int y, int tile); // Blit a tile from our tileset to the screen void Wait(Uint32 ms); //waits ms miliseconds int TimeElapsed(); //Get the time passed since last time control void UpdateTimer(); //Update the start time control void TextOut(int x, int y,const char *TextOut); void SetTextColor(SDL_Color color); protected: private: }; #endif // ENGINE_H
<I will show here only the updated /new functions to avoid confusion, i have updated the creator and destructor, the blitting function, mouse drawing and text drawing>
<engine.cpp>
Engine::Engine()//Create the class and assign default values
{

SDL_Init( SDL_INIT_VIDEO ); //We start SDL, just video at the moment

screen=NULL;
tileset=NULL;
text=NULL;

SDL_WM_SetCaption( "Rpg tutorial", NULL ); //Caption of the window

SDL_ShowCursor(SDL_DISABLE); // hide system mouse

//Initialize SDL_ttf
TTF_Init() ;

//Open the font
font = TTF_OpenFont( "CARBONBL.ttf", 28 );

TileSize =100; // size of the default tile 100 pixels x 100 pixels

ScreenX=800; //screen width
ScreenY=600; //screen height
bpp=32; //screen bpp

StartTick = SDL_GetTicks();//Initialize timer
Frames=0; //Initialize frames = 0
}

Engine::~Engine()//Destructor
{
    //Free all the surfaces
    SDL_FreeSurface(screen); //Free screen surface
    SDL_FreeSurface(tileset); //Free tileset surface
    SDL_FreeSurface(text);    //Free text surface
//Close the font that was used
TTF_CloseFont( font );
//Quit SDL_ttf
TTF_Quit();
SDL_Quit(); //Close SDL
}
void Engine::DrawMouse()
{
BlitTileset(MouseX,MouseY,24); //Blits the mouse pointer into the screen
}
void Engine::BlitTileset(int x, int y, int tile) //Blits a tile from our tileset to the screen
{
SDL_Rect start,end;
//set the cliping for the source surface (the tileset)
start.x= (tile%8)*TileSize; //Column = tile % 8 (0-7)
start.y= (tile/8)*TileSize; //Row = tile / 8 (0-7)
start.w=TileSize;
start.h=TileSize;
//set the cliping for the destination surface (the screen)
end.x =x; // X
end.y =y; // Y
end.w = TileSize;
end.h = TileSize;
SDL_BlitSurface(tileset, &start, screen, &end); //Blits a tile from our tileset to the screen
}
void Engine::TextOut(int x, int y,const char *TextOut)//Renders text
{
text= TTF_RenderText_Solid( font, TextOut, textColor );
SDL_Rect dtext;
dtext.x=x;
dtext.y=y;
dtext.w = text ->w;
dtext.h = text ->h;
//Apply the text to the screen
SDL_BlitSurface(text, 0, screen, &dtext);
}
void Engine::SetTextColor(SDL_Color Color)
{
textColor= Color;
}
<Well, that was long! but now we have loaded a full map into memory and can travel north and south, east and west with the arrow keys on the keyboard, (i think it's a good start point) , ¿What to do next? , for me the question is clear: we need the hero to be more than a sprite moving up and down: we want it to have a name, skills, equipment.... I'm going to design a class that will be the hero with all the skills, and i want to Create the hero before actually we start "playing" the game>
Next tutorial topic is going to be: The Hero class + Creating heroes + Game Menus....
See you soon
P.D. You can find the code for the tutorial in the <Download page >

